Mini LED lighting board part 4
Continuing from the previous session.
The two completed boards can be replaced with the LED boards of Lumissil's evaluation board, so it is completed by replacing them.
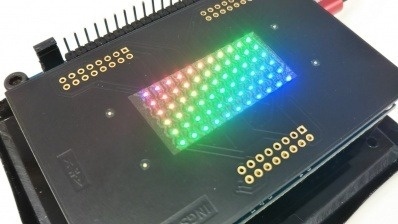
For the lighting pattern, we used the one that was included in the evaluation board from the beginning. This is a demo that moves the gradation like the picture.
The color of the entire screen changes, the gradation is applied diagonally as shown in the picture, and several patterns can be switched.
Actually, the company logo is lit up and animated. .. .. we thought, but it seems that 11x6 pixels can not do much, so we are leaving the software that was originally included.
In addition, we have prepared a rewritten firmware of the evaluation board microcomputer (STM32) so that all white lighting, all red lighting, etc. can be performed for evaluation.
Since the evaluation board has a pin header, it can be easily connected to ST-LINK Ver.2.
In the photo above, it looks like 11x6 spots of light are lined up.
In reality, three LEDs, Red, Green, and Blue, are densely arranged at each point. Since RGB are lined up in 0.2 x 0.5 mm, it seems that almost one point is shining to the naked eye. We think it was a demo that clearly shows the features of the mini LED.
Since we were able to bond it on a PCB, we decided to try bonding it on an FPC next.
(Continued to Part 5)